Sunday, January 29, 2012

Fireflies and Dandelions...

http://www.etsy.com/shop/BootsNGus?ref=pr_shop_moreCanopy Mason Jar Chandelier Light - Upcycled BootsNGus Swag Lamp Design - Dining Room Table - Kitchen Island Hanging Lighting Fixture

Remember summer nights filled with the soft yelling of children off in the distant playing at the softball park... chasing fireflies around your backyard hoping to catch them in your jar? I long for those memories as we approach Spring my mind gets filled with a plethora of ideas I want to do to the backyard; bird feeders and baths, Christmas lights lining the fence, chandelier mason jars or big round circus style light bulbs.

These bad boys shouldn't be hard to make at all!
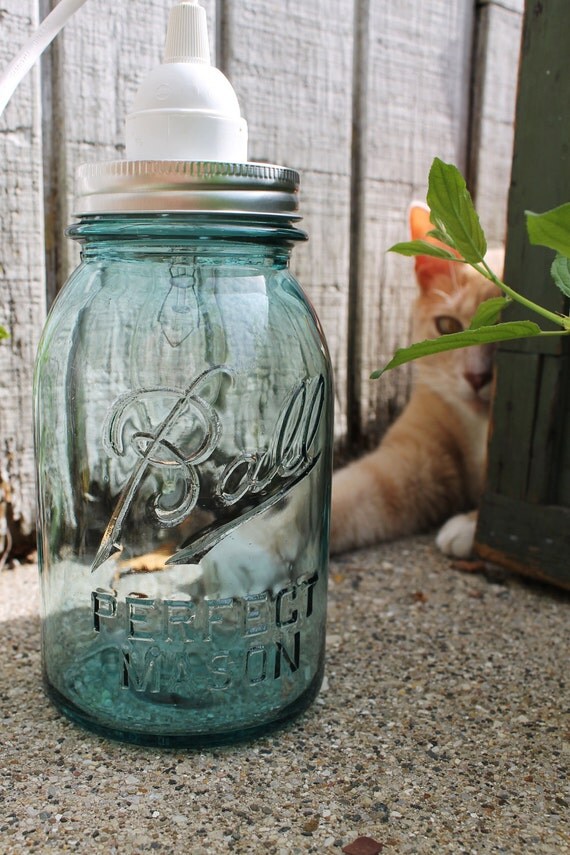
- Swing on by your local hardware store pick up few pendent light ropes (SMALL Socket) or the parts to make one from scratch if your handy like;
- Then grab some mason jars and pick up some new lids if your out ( 2 part lids work best )
- Center and trace ( on the underside of lid ) the light bulb socket, (don't worry about getting it exactly perfect the idea is that when the light bulb is screwed it will be snugger, by being held up by the threading of the lid itself.)
- Now this is where it gets a little tricky, you have to cut the lid- I recommend using a sturdy surface and a cutting impliment; cut a small " X " within the circle you already traced.
- Now after you have cut the "X" push from the top inwards so you end up with a small hole that the light bulb fits thru. Grab some good tape [electric, gaf or Duck tape works best] tear a few tiny pieces and wrap tape from folded cut end of lid and place tape over raw edges being sure to keep as clean of an edge as you can.
{ This is just the protect you from possible small scrapes later on down the line }
- Screw in light bulb - hang - enjoy

OR

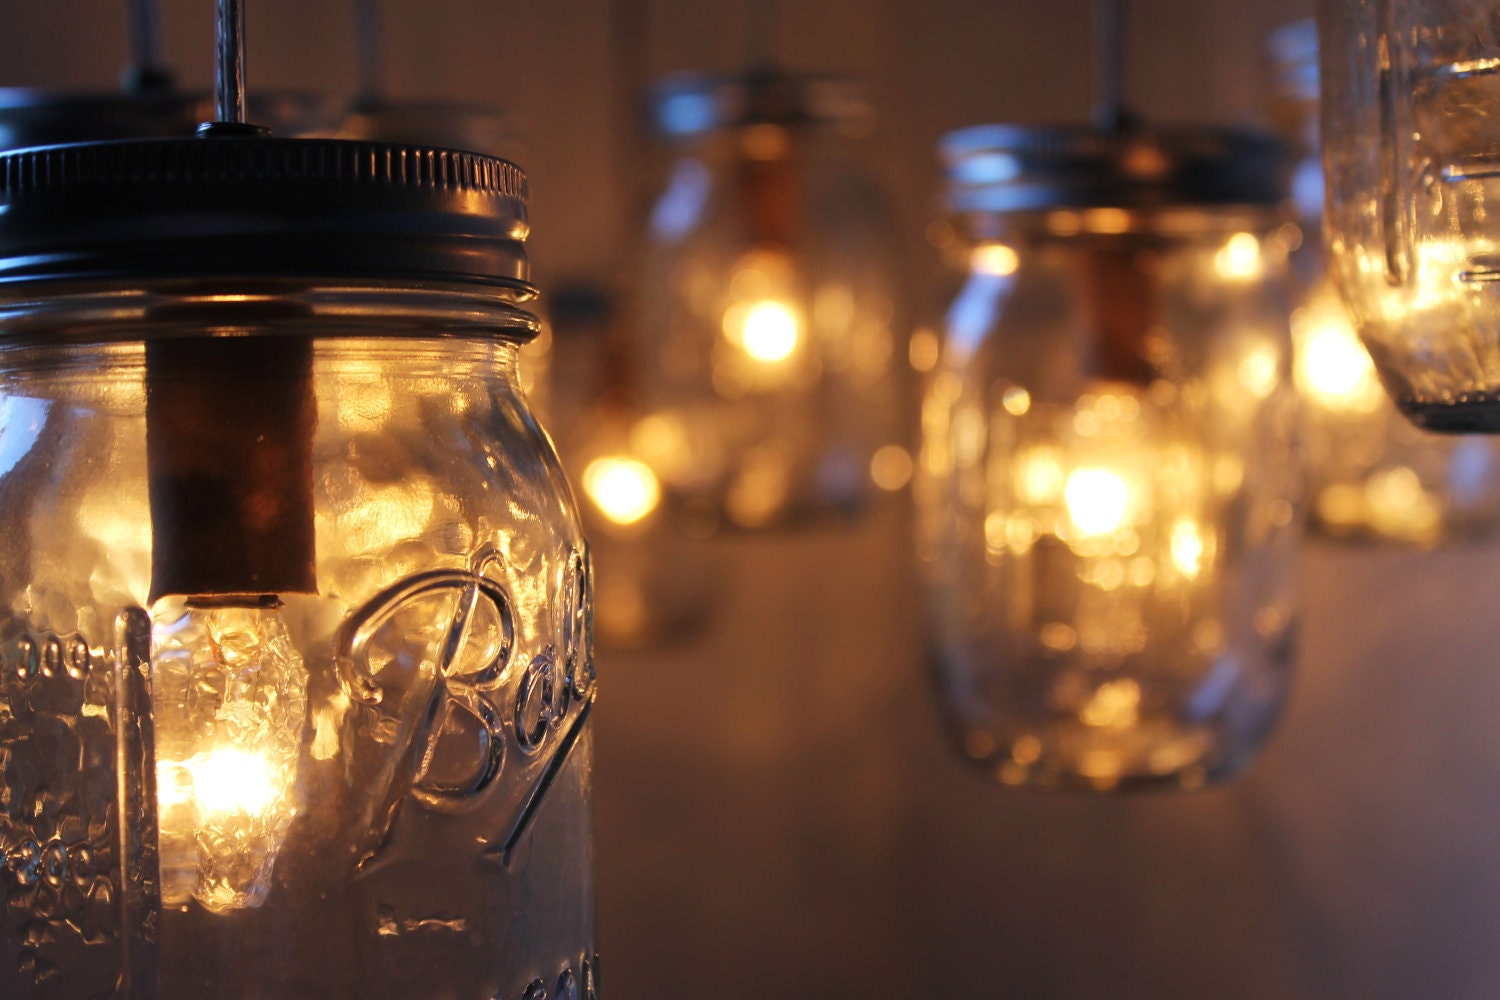
You can purchase these beautiful pieces of art on etsy.com the artist uses vintage mason jars and creates some AMAZING chandeliers that simply must be enjoyed!

http://www.etsy.com/shop/BootsNGus?ref=pr_shop_more

SAPPHIRE Sea Blue Glass Ball Mason Jar Hanging Pendant Lighting Fixture - Upcycled BootsNGus Vintage Glassware Design

Ooooooo the ever so elusive...

Hummingbird Cake! I have only dreamt of making this beauty... And THIS Spring I will by gollie! Ahh she is so pretty... I will let you all know how it goes!


Hummingbird Cake Recipe


Ingredients


  • Preparation: 
  • 3 cups all-purpose flour
  • 1 teaspoon baking soda
  • 1 teaspoon salt 
  • 2 cups sugar
  • 1 teaspoon ground cinnamon
  • large eggs, beaten
  • 1 cup vegetable oil
  • 1 1/2 teaspoons vanilla extract
  • (8-ounce) can crushed pineapple, undrained 
  • 1 cup chopped pecans
  • 2 cups chopped bananas 
  • Cream Cheese Frosting  (can be in the jar for ease)
  • 1/2 cup chopped pecans
  1. Combine first 5 ingredients in a large bowl; add eggs and oil, stirring until dry ingredients are moistened. (Do not beat.) Stir in vanilla, pineapple, 1 cup pecans, and bananas.
  2. Pour batter into three greased and floured 9-inch round cakepans. Bake at 350° for 25 to 30 minutes or until a wooden pick inserted in center comes out clean. Cool in pans on wire racks 10 minutes; remove from pans, and cool completely on wire racks.
  3. Spread Cream Cheese Frosting between layers and on top and sides of cake; sprinkle 1/2 cup chopped pecans on top. Store in refrigerator.


http://www.myrecipes.com/recipe/hummingbird-cake-10000000387218/

OH MY GOD....

REALLY... Yippieee. I cant even tell you how I am already half way to making these; I think I have died and gone to heaven... I should schedule a Dentist app before these finish...


Samoas Bars, stacked


Homemade Samoas Bars
Cookie Base:
1/2 cup sugar
3/4 cup butter, softened
1 large egg
1/2 tsp vanilla extract
2 cups all purpose flour
1/4 tsp salt
First, make the crust.
Preheat oven to 350F. Lightly grease a 9×13-inch baking pan, or line with parchment paper.
In a large bowl, cream together sugar and butter, until fluffy. Beat in egg and vanilla extract. Working at a low speed, gradually beat in flour and salt until mixture is crumbly, like wet sand. The dough does not need to come together. Pour crumbly dough into prepapred pan and press into an even layer.
Bake for 20-25 minutes, until base is set and edges are lightly browned. Cool completely on a wire rack before topping.
Topping
3 cups shredded coconut (sweetened or unsweetened)
12-oz good-quality chewy caramels
1/4 tsp salt
3 tbsp milk
10 oz. dark or semisweet chocolate (chocolate chips are ok)
Preheat oven to 300. Spread coconut evenly on a parchment-lined baking sheet (preferably one with sides) and toast 20 minutes, stirring every 5 minutes, until coconut is golden. Cool on baking sheet, stirring occasionally. Set aside.
Unwrap the caramels and place in a large microwave-safe bowl with milk and salt. Cook on high for 3-4 minutes, stopping to stir a few times to help the caramel melt. When smooth, fold in toasted coconut with a spatula.
Put dollops of the topping all over the shortbread base. Using the spatula, spread topping into an even layer. Let topping set until cooled.
When cooled, cut into 30 bars with a large knife or a pizza cutter (it’s easy to get it through the topping).
Once bars are cut, melt chocolate in a small bowl. Heat on high in the microwave in 45 second intervals, stirring thoroughly to prevent scorching. Dip the base of each bar into the chocolate and place on a clean piece of parchment or wax paper. Transfer all remaining chocolate (or melt a bit of additional chocolate, if necessary) into a piping bag or a ziploc bag with the corner snipped off and drizzle bars with chocolate to finish.
Let chocolate set completely before storing in an airtight container.
Makes 30 bar cookies.
Note: You can simply drizzle chocolate on top of the bars before slicing them up if you’re looking for yet an easier way to finish these off. You won’t need quite as much chocolate as noted above, and you won’t quite get the Samoas look, but the results will still be tasty.


Home...

Pinned Image

MONKEY!!!!!! Bread.... sorry I just love saying that.

Now I know we all are looking for different easy ways to spice up our evening meal, I was looking @ pinterest and I stumbled upon this AMAZINGLY FUN IDEA...


Pepperoni Pizza Monkey Bread


Pepperoni Pizza Monkey Bread

You can take the long route and make your favorite pizza dough and marinara sauce, or the short route and pick up your favorite pizza dough and red sauce from the store.

Ingredients

  • 2 cloves garlic, thinly sliced
  • 4 Tbsp butter
  • 2 lbs pizza dough (I used this recipe because it makes enough for two pizza)
  • 6 oz mozzarella cheese, cut into small cubes (you'll need ~48 pieces)
  • 48 slices of Turkey pepperoni (from 1 package)
  • 2-3 cups marinara sauce, warmed, for serving

Instructions

  1. Heat garlic and butter over medium heat just until the garlic begins to brown. Remove from heat and let sit.
  2. Lightly brush the inside of a bundt pan (or other oven-safe dish) with garlic butter.
  3. Pull off large marble-sized balls of dough and flatten (~2/3 of an ounce, a kitchen scale makes this very easy). Top with a slice of pepperoni and a cube of mozzarella.
  4. Pepperoni Pizza Monkey Bread 
  5. Wrap the dough around the pepperoni and cheese, pinching well to seal.
  6. Very lightly brush the pizza ball with garlic butter and place into the bundt pan (I dabbed the pizza balls on a butter-dipped silicon brush to keep butter use low - there will be 1+ Tbsp leftover - and my hands butter free. Buttery hands make it hard to get the pizza balls to seal).
  7. Repeat until all of the dough is used.
Pepperoni Pizza Monkey Bread

7. Cover and let sit for 30 minutes, while preheating the oven to 400.
8. Bake for ~35 minutes, until the top is very brown.
9. Remove from the oven and let sit for 10 minutes.
10. Turn out onto a platter and serve with warmed marinara sauce for dipping.

Pepperoni Pizza Monkey Bread

A Pre~Spring Clean...

Ahhhh the complete joy one gets when they look out their window and its COMPLETELY clean! YUP... 
NO streaks or ever so faint film of yukiness from a looong time of build-up.

But I stand here on top of my little hill smile on my face and fists up in the air yelling "YES! I CAN SEE THE YARD!!! WOOHOO..." (ok... maybe not so dramatic... but you get the idea)

My Trick:

~ Windows: 1/2 Water - ½ Vinegar = HEAVEN in a spray bottle for windows


BUT did you know….

In addition to your regular bottle of vinegar, a really useful item is a spray bottle. Ideally, you want two--one with pure vinegar, the other with a half vinegar, half water combination. Having vinegar in a dispenser of this type makes its use much simpler in many cases.

BUT WAIT! What if you have YEARS of yucky buildup on your interior kitchen windows? 
well; For THE BEST WINDOW CLEANER to remove YEARS of build up I recommend following this simple addition to your cleaning basket;


~ Make a great all-purpose window cleaner by combining 1/4 cup vinegar, 1/2 teaspoon liquid soap or detergent, and 2 cups of water in a spray bottle. Shake to blend and spray on your windows!


And here are some Top 10 uses in case you didn’t know or just forgot in our furry of convience… http://www.care2.com/greenliving/annies-top-10-vinegar-uses.html


San Francisco's Meyers...

Life’s Lemons;
Self-sufficiency in Meyer lemons is the goal of a citywide project supported by Friends of the Urban Forest, set to start early this spring. As envisioned by longtime urban activist Isabel Wade, the first step would be mapping every Meyer lemon tree in town, says FUF program director Doug Wildman. It's thought there might be 3,000 to 4,000 already flourishing in San Francisco; 12,000 trees - to be planted in pots or in the ground - would make us self-sufficient.
Despite this high-minded goal, I'm fretting about an abundance of lemon bars making brownies an endangered species in our town.
P.S.: The Flea Market column of the online SLAC (Stanford Linear Accelerator) National Accelerator Laboratory news site includes an offer forwarded by Jamie Jobb: "Do you still have some old, unused IBM 80-column punch cards collecting dust somewhere? Let's trade. I can offer eggs from our free range chickens from our organic farm."


SF Ferry Bld Farmers market

Yummm Farmers market goodies @ the SF Ferry bld.

Saturday, January 28, 2012

Christmas Past

Ahhhhh La Sigh... Sur La Table; dreamy, simply dreamy...


"Winter's comin'..."


"Winter is coming”…

Or so we have been led to believe… not much a winter here is our parts and for that I am so very grateful! With things the way they are these days & a number of friends that are homeless/sleeping in their car or couch surfing while trying to find a really cheap room to rent on the little bit they make; we here in the bay are trying to survive & we do it proudly! A heavy, raining sit-storm of Mother Natures fury would simply just not be good right now and it is this main faction of life that inspired me to create this blog.

The community we are all a part of is beautiful, strong, supportive and a blessing; I only wish to spread the love with lil pearls of wisdom I have or find. Whether its how to cut costs on cleaning products with natural alternatives we might have forgotten about in our fury of convenience; or if its quickly throwing a few things together for an impromptu Tea Time with some friends; the possibilities are boundless.


My entire life I have been on and off the welfare wheel and it seems to me that now in a time in America when it's desperately needed for more people than any other time; its sheik to be on Food Stamps… It’s ”The Hipster thing to do” if you will...
      {”Hipsters Hoping on Food Stamps…” Now there’s a title of a YouTube video in the making.}

I have discovered that you can buy & make some AMAZING things on food-stamps! So amazing that you can serve a simple dish of Swai deliciousness and have your friends exclaim " This is EASILY a $30 plate at... "  and I will show you how you can make that meal for less than $3 per person.
I will also bombard you with tons of links, recipes, pictures of things that make you warm and fuzzy inside and ideas to help inspire you to re-create those feelings at your very whim. We all need to have a little something with us in our day to day that brings us back to "Home within our selves", I look forward to seeing what your "Home" will be!


It is my love of the inter-webs and the desire to share all things beautiful, useful and fun. I hope that you join me in my journey to create a place that you can go to to find interesting tidbits or leave some for others to find. I would love to have many, many authors for the blog and I encourage you to email me and request to be added to the forum, the more the merrier. My vision for The Chirping Tree is to share your daily finds, your Favorite Blogs or simply the things you Stumble Upon that you want to share with others.


Feel Free to tag, link, email, Post or Blog about our blog; and please, by all means… INVITE your friends!
Because without you… how would we all finds such treasures and treats?

And now after all my ramblings; I would like to officially welcome you to " The Chirping Tree " POST AWAY!

Ciao!
Jenn
x0x0